Saturday, December 30, 2023

Etsy vs. Ravelry

In creative circles, there is an ongoing debate about which online platform is best for selling patterns: Etsy or Ravelry. And more sites are regularly coming online to also try to grab a piece of the action, such as Ribblr, LoveCrafts, Ko-fi, and more. 

As a pattern designer, I have used both Etsy and Ravelry to sell patterns, so I can speak to this debate from the viewpoint of having used both. 

Etsy charges sellers a fee for their listings (and the listings expire and have to be renewed every X number of days, which means you pay the listing fee again) whether you sell anything or not. Ravelry doesn't charge listing fees, and your listings never expire; it only charges you a fee when you make a sale. Depending on your individual needs and goals, there are different advantages and disadvantages to each platform, so the answer of which platform is best is entirely dependent upon your particular situation. There is no one-size-fits-all best answer.


Wednesday, December 6, 2023

Mini Dino in chenille

These adorable mini dinos are so fun and fast and easy to make. The free pattern is Mini Dino by MerryMakes. A member of my family gifted me this skein of bulky chenille yarn, so naturally I had to see how this pattern would work up in the bulky yarn using an 8mm hook. (There wasn't a label on the skein, so I don't know what brand or colorway this yarn is.)


For the eyes I used a pair of 20mm black buttons from this set I found on Amazon


This mini dino is made by following the same pattern as the smaller dinos, same stitch and row counts. The only difference is the size of the yarn and hook, which produced a dinosaur about 12 inches tall.


Tuesday, November 28, 2023

But it fits!

This meme by Nicki of Nicki's Homemade Crafts made both me and my husband laugh out loud. Too funny!


Thursday, November 16, 2023

Giant Timothy T-rex

I had this one skein of colorful Red Heart Super Saver Color Block yarn in the Party Time colorway that I wanted to use to make something for Rose. Orange is featured prominently in the colorful skein, and orange is one of Rose's favorite colors. 


At first I tried to see if there was enough yarn to make something to wear, like a "Housecoat of Many Colors" sort of thing. But the one skein wasn't enough for that, and apparently the colorway was discontinued, so I couldn't buy more.

Not enough yarn to make a cardigan or blanket

So then I had another idea: Why not make a giant Timothy T-rex for Rose by holding the colorful yarn double with a neutral gray and using an 8mm hook? And that's how this giant Timothy was born. 

Timothy and friends

The pattern specifies to use 10mm safety eyes, but I didn't have any safety eyes on hand, so I used two 25mm black buttons from this kit that I found on Amazon. It has black buttons in a bunch of different sizes, so they are useful for lots of various projects. So far I have used these buttons for eyes on a few recent amigurumis: my Zoey Zebra and also my Halloween Melly Teddy Ragdolls Gabby Ghost and Bobby Bat.


Holding the two colors of yarn together and working at this large gauge with an 8mm hook, my finished Timothy stands about 15 inches tall. I hope he will make a nice, snuggly companion for Rose!


Thursday, October 26, 2023

Adult Crochet V-Neck Vest Cardigan-Style

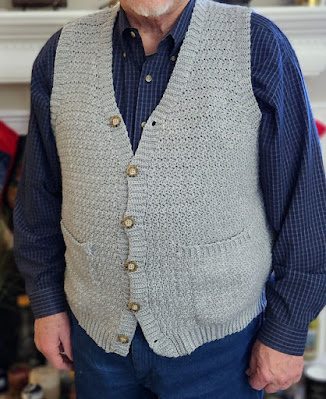
After making this Yarnspirations pattern as written for a pullover vest, now I decided to see if I could adapt it to also make a cardigan-style vest for my husband. It is made with Bernat Softee Baby Solids & Marls yarn in the Flannel colorway. (Here's a link to my post about the pullover vest.)


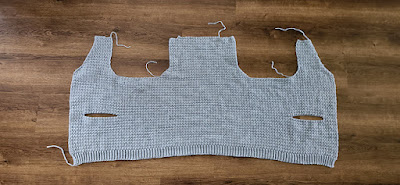
Since this design is worked from the bottom up, the lower part of the torso will be seamless from the bottom edge up to where we divide for the armholes, which I think will look nice, and it also means that the only seams to sew will be the joins at the top of the shoulders. 

Main body done, including pocket openings

I also added pockets to the front panels, and the button placket is completed with six tortoiseshell buttons that are 7/8-inch across.

After 2 skeins about 12.5 inches tall

This project took me most of a year to complete only because I had a lot of big projects at work and just a whole lot of other things going on all year, which greatly reduced my time for crocheting. Normally, a project this size would take a few weeks to finish. Thankfully, things settled down enough for me to finish this in time to give it to my husband for Christmas.

After 1 skein about 6.5 inches tall


Tuesday, September 12, 2023

Neo and Scoop Mini-Dinos free pattern

Since the beginning of the year I have been in the middle of several large, long-term projects and felt like I needed to give myself a mental break and make something that works up super fast but also gives a finished product that is super satisfying. 


This Mini-Dino designed by Mary of the MerryMakes blog turned out to be just the project that my weary heart needed. He is SO STINKIN' CUTE!!! And he was really fast and easy to make. I wuv him!!! I also love that Mary has a video tutorial that walks us through every step of the creation process.


I made mine with a 5.5mm hook, which is a larger hook than the pattern specifies, but I tend to crochet tighter than the average bear anyhow, so I think it worked out fine. At the gauge I was working, my dino turned out to be about 6.5 inches tall. For comparison, Mary's Mini-Dinos work up to be about 5 inches tall when made with worsted weight yarn and a 4mm hook. I was also using the yarn-over single crochet technique rather than the more traditional yarn-under single crochet technique that a lot of amigurumi makers use. Mary also works her dinos using the yarn-over single crochet, but I've read that if you use the yarn-under single crochet, your finished item will be slightly shorter than if you used the yarn-over single crochet.

The pattern also specifies to use 6mm safety eyes, but I didn't have any safety eyes on hand, so I used two 10mm black buttons from this kit that I found on Amazon last year. It has black buttons in a bunch of different sizes, so they are useful for lots of various projects. So far I have used these buttons for eyes on a few recent amigurumis: my Zoey Zebra and also my Halloween Melly Teddy Ragdolls Gabby Ghost and Bobby Bat.

Just because he is soooo adorable, here's another picture of Neo posing on the coffee table with my Round Basket for Square Coasters. 😍

Neo turned out so cute that I decided he needed a friend, so I used a small scrap of Red Heart Super Saver in the Zebra colorway to make his friend Scoop. Scoop looks like newsprint from a newspaper, so that's how she got her name.


Wednesday, August 9, 2023

Raffie Sun Hat free pattern

This sun hat pattern by Kinga Erdem is drop-dead gorgeous, so I just had to make one. The Raffie Sun Hat pattern is available for free on Kinga's blog, My Hobby Is Crochet.

But I did have to adjust the pattern somewhat to make it in a messy-bun style to accommodate my everyday hairstyle. I used the Peekaboo Sun Hat design by Susanna Biyae as my guide for that. The Peekaboo Sun Hat pattern is available for free on Susanna's blog, Fosbas Designs.


I think I used a thinner raffia than Kinga used for hers, so it wasn't possible for me to meet gauge using the suggested hook size. I went up two hook sizes and also worked the top of the hat to 75 stitches to get to the size I need. My polyester raffia yarn came from Amazon


The cluster-stitch pattern for the sides of the hat crown needs a stitch count in a multiple of 3, so changing the stitch count is fairly easy. Kinga works hers in the round (so the right side of the work is always facing you), but for mine I was doing mine in rows (to make the back of the hat open). Fortunately for me, it was possible to work the cluster-stitch pattern she uses simply by reversing the order of the cluster stitches on the wrong-side rows (to keep the clusters "leaning" the same direction). Easy peasy. Working the rows this way probably changes the look of the cluster-stitch pattern somewhat, but I think it turned out great.

The wire rope I used to reinforce the brim came from Home Depot. This product was recommended by Jess Coppom in her free Fedora Crochet Sun Hat pattern, which is available on her blog, Make And Do Crew.

The last thing to figure out is the hat band. I used a 4mm hook and chained 150, which was long enough to wrap around the crown of the hat with ends long enough to tie in a loose square knot. I don't know if I'll leave it like that or if I'll maybe try adding some beads to dress it up a bit without being too busy.

My husband and I have a lovely vacation coming up, and I'm super excited to get to take this gorgeous sun hat along to wear during our adventures.

Monday, July 24, 2023

Condensation fighter

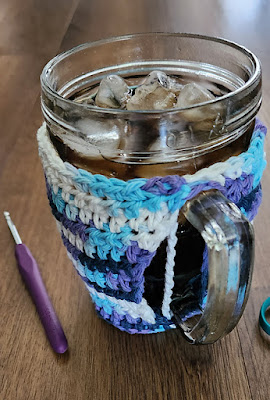
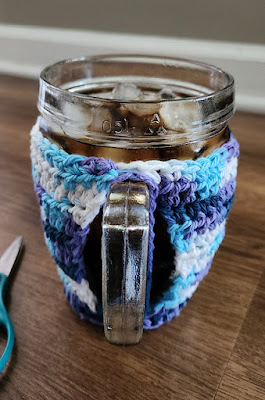
This is just another quick cotton cup cozy I whipped up to fit my glass filled with a refreshing drink with ice. 

I hate dealing with condensation on the outside of my glass, so I use a lot of cotton cup cozies in the summer. 


No pattern for this; I just crocheted this to fit the size of my glass. The cozy is secured with straps that fit over the handle in pretty much the same way a face mask's straps fit over a person's ears. 


A woman in a crafting group shared her idea for securing a cup cozy this way, no buttons or other fasteners required, and I thought it was very clever, so I wanted to try making a cozy that way too. 

Here's a link to my Ravelry project page.


Sunday, July 16, 2023

Zuzu's Petals - fingering

This is my very first project using fingering weight yarn! And if that weren't a cool enough fact all by itself, the yarn I'm using is a lovely ball that I found at a thrift shop for only 99 cents! How's that for cool?!


The yarn didn't come with a manufacturer's label on it, so I have no idea what brand it is or even what the fiber content is. It kind of feels like it has cotton in it; it might even be 100% cotton, for all I know. I just liked the color - it reminds me of the faded grayish blue of denim blue jeans, and I think it will make a lovely Zuzu's Petals cowlette. This is a paid pattern designed by Carina Spencer.


Because the width of the neck opening was only 16 inches when I reached the end of section 1, I knew I would need to keep adding width to make it be possible to pull the cowlette over my head. I decided to work two more 12-row repeats, hoping that would bring the width to something closer to 20 inches wide, which I figured would be a dimension that would fit better over my head. That meant my final stitch count at the end of section 1 was 151.

End of section 1 with 103 stitches


End of section 1 with 151 stitches

As I got toward the end, I was worried about losing at yarn chicken (running out of yarn, in other words). So I skipped the optional purl round and instead went directly to the cast off. But then, after casting off, I could see that I did actually have enough yarn left on the skein to be able to do the purl round, so I tinked back the cast-off round and added the purl round before casting off again. I just knew that I would always regret not having the purl round in there, if I didn't add it, because it really does help straighten out the edge curling, even before blocking. 

Before blocking

I could have saved myself the trouble of tinking back if I had weighed my skein when working the last few rounds. If I had weighed it, I would have been able to  know that I'd have enough to work the last optional purl round before casting off. Live and learn! But it was pretty close!

Blocking

Gauge


Saturday, June 10, 2023

Peekaboo Sun Hat free pattern

I first attempted this pattern in 2020, right before my family decided to move cross-country, so this project got put away for a few years until things started to settle down again. But I never forgot about it because I think it's a great pattern. I wear my hair in a messy bun during the day at least 99% of the time, so I love hat patterns that are designed to accommodate my preferred hairstyle.


Messy bun hats for winter became all the rage a while back (which was great for me), and we saw many variations of beanie patterns designed that way, but there still aren't many summer/sun hats around that are made to work for long-haired people who want to both wear their hair up and also wear a hat for sun protection in summer.


This Peekaboo Sun Hat designed by Susanna Biaye is a very well designed, great solution to that dilemma. I love it.


In 2020, I initially started working the pattern using some leftover Red Heart yarn in my stash, but it didn't take long for me to realize that this heavy worsted acrylic fiber was not going to make a hat that would feel comfortable to wear in the summer heat. Then, as I said before, life got in the way, and this project got shelved.

First try in Red Heart acrylic

When I finally had time to think about trying this pattern again in April 2023, I had decided I wanted to make it using either some thin jute cord or else maybe a raffia paper ribbon.

I had most of a spool of this 2mm jute cord in my crafting stash (leftover from making tags for Christmas ornaments, etc.) and decided to see if I could use it to make the Peekaboo Sun Hat. (One 1,100-foot spool of the jute cord is amply more than enough to make one of these hats.)

The jute is very coarse, but it was surprisingly easy to crochet with using a 5.5mm hook. However, to make the hat more comfortable to wear, I plan to add an interior band (like a sweatband) cut from one of my husband's old T-shirts. I will also tack on a black grosgrain ribbon as a hatband on the exterior. It took me a few weeks after completing the crochet part of this project to finish sewing on the black band by hand.

Because I was working at a different gauge, I had to modify some of the stitch/row counts from the original pattern, but that wasn't too difficult.

The roughness of the jute fiber gives the hat a bit of a broken-in look like you'd see on a gently-worn old straw hat. I think this will be a great hat to wear while working in the garden or even while out hiking.

This is the first time I've ever added a wire to a hat brim for shaping. From the little I've read about the process, it seems that using a thin twisted cable type of galvanized flexible wire is better for hats than a single-ply wire. The thin wire cable is marketed under many descriptive key words; I found what appears to be a suitable product by searching for "picture hanging wire." Each hat brim needs about 50 inches of the wire (or about 1.4 yards), so you obviously don't need to buy a 100-foot roll of the stuff unless you're planning to mass-produce a lot of crocheted sun hats. 

The trickiest part for me, since I'm new to adding wire to hats, was figuring out which gauge of wire would be heavy/strong enough to hold the brim in shape without being too heavy or too thin. Again, from the bit of reading I've done of what other yarncrafters have written about adding wire to hat brims, is that a wire gauge of somewhere between 16 gauge (about 1.6mm or 1/8th-inch thick) to 20 gauge (about 0.9mm or 1/16th-inch thick) is the ideal.

After a lot of clicking around, I found this blog post and pattern for the free Fedora Crochet Sun Hat by Jess Coppom of Make and Do Crew; she suggested this 1/16 in. x 50 ft. Galvanized Steel Uncoated Wire Rope from Home Depot, and I decided to use that wire for my hat brim.

If you look at my photo where I'm in the process of adding the wire to the brim, you'll see how the part of the brim with the wire is lying flat, whereas the part of the brim without the wire is lying crumpled and shapeless. It's fun to see how the simple addition of the wire is a game-changer for shaping the wide brim of the sun hat.


The brim on my hat is about 3.5 inches deep with 144 stitches around. I used a 6.5mm hook for working the last round with the wire added.


Thursday, June 1, 2023

Haiku Cardi crochet style

I decided to experiment with making a crochet version of the Haiku Cardi. For the fabric, I used the stitch pattern from the Genuine Pleasure Shawl, a free pattern designed by Jamie Swiatek, but just about any triangle shawl pattern with repeating rows would do because that is the base shape for the Haiku Cardi. 


The Genuine Pleasure Shawl has a 10-row pattern repeat, but it's easier to memorize than it sounds, so once you get into the rhythm of it, it becomes simple to read your stitches to figure out where you are as you go without having to constantly keep referring back to the pattern.


I made this to be a housecoat/bathrobe/dressing gown for our guest room, so I made the length a bit longer than I would for a regular cardigan, and I also added pockets to the front using the pockets from the Lazy Diamond Boho Pocket Shawl, a paid pattern designed by Crystal White-Van Cleemput, just because they work up quickly and look super cute.


Monday, May 29, 2023

Zoey Zebra Melly Teddy Ragdoll

I only made it through the first two parts of the free Zoey Zebra crochet-along before life got in the way and I regrettably had to set the project aside for a few months. By the time I was able to pick it up again, the free links were gone, so I decided to endeavor to finish the project by making the remaining pieces based on the designer Melanie Grobler's photos.


It was easy enough to approximate the legs by looking at the photos, but when it came to the ears, I decided to google around to find something similar that someone else had done and shared the steps. Why reinvent the wheel if I didn't have to, right? I used the ears from Jess Huff's Heidi the Horse free amigurumi pattern, which is also available at this link.


For the rose, I used the free 3D Rose pattern by Lisa Auch, which is also available at this link.

The eyes are 12mm black buttons from this set on Amazon.

Here is a link to my Ravelry project page.


Sunday, May 14, 2023

Yarn tunnel

We now interrupt your regularly-scheduled scrolling to present to you this yarn tunnel.

Who doesn't love a great yarn tunnel? 😄 This yarn tunnel comes to you courtesy of my latest WIP, which will hopefully be finished soon, so I can share it with all y'all. Stay tuned!


Who's got next?!? 😂